

第一章 MCP(模型上下文协议):连接大模型和外部世界的 USB-C 接口
MCP(模型上下文协议)最近比较火, 正在逐渐成为智能体(Agent)与外部交互的标准协议。MCP 最初是由 Anthropic 公司发起的一个项目,旨在让像 Claude 这样的 AI 模型更轻松地与工具和数据源进行交互。如今,MCP 已经不再仅仅是 Anthropic 的项目。MCP 是一个开放的协议,一种 AI 应用开发的新范式,越来越多的公司和开发者正在加入其中。
介绍 MCP 协议的相关概念、架构、优缺点、应用场景。
1.1 什么是 MCP
MCP(Model Context Protocol,模型上下文协议)是一种开放协议,旨在实现大型语言模型(LLM) 应用与外部数据源、工具和服务之间的无缝集成,类似于网络中的 HTTP 协议或邮件中的 SMTP 协议。
可以将 MCP 想象成智能体应用程序的 USB-C 接口,它为连接 AI 模型与不同的数据源和工具提供了标准化的方法。
![图片[1]-AI 应用开发新范式 MCP 技术详解-深渡AI-智启未来](https://oss.shenduai.net/2025/07/20250718113123942-1024x576.png)
1.2 为什么需要 MCP
传统的做法,将 AI 系统连接到外部工具需要集成多个 API。每个 API 的集成意味着单独的代码、文档、身份验证方法、错误处理和维护工作。
1.2.1 传统 API 像每扇门各自的钥匙
从比喻的角度来说:APIs 就像一扇扇独立的门——每扇门都有自己的钥匙和规则:
![图片[2]-AI 应用开发新范式 MCP 技术详解-深渡AI-智启未来](https://oss.shenduai.net/2025/07/20250718113156695-1024x576.png)
传统 API 要求开发者为每个服务或数据源进行集成开发。
1.2.2 MCP VS 传统 API
| 特性 | MCP | 传统 API |
|---|---|---|
| 集成开发工作量 | 单一、标准化的集成 | 每个 API 都需要单独集成 |
| 实时通信 | ✅ 是 | ❌ 否 |
| 动态发现 | ✅ 是 | ❌ 否 |
| 可扩展性 | 容易(即插即用) | 需要额外的集成开发 |
| 安全性和控制 | 在工具间保持一致 | 因 API 而异 |
MCP 和传统 API 的主要区别:
- 单一协议:MCP 作为一种标准化的“连接器”,意味着集成一个 MCP 就有可能访问多个工具和服务,而不仅仅是一个。
- 动态发现:MCP 允许 AI 模型动态地发现可用的工具并与之交互,无需对每个集成进行硬编码。
- 双向通信:MCP 支持持久化的、实时的双向通信——类似于 WebSockets。AI 模型可以动态地检索信息和触发动作。
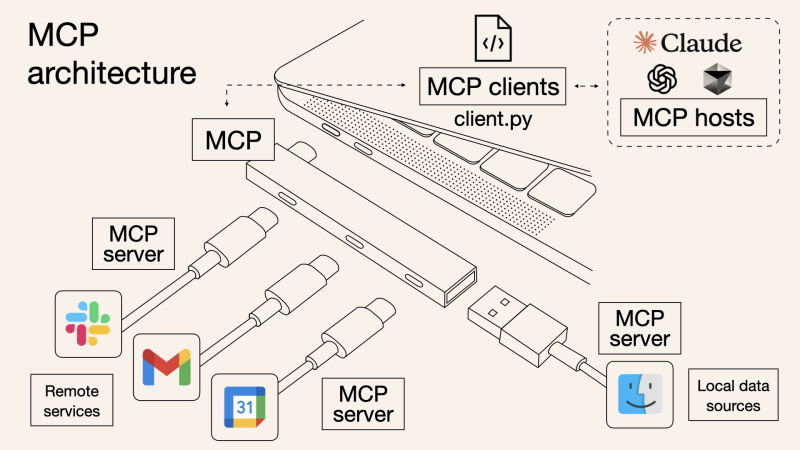
1.3 总体架构
MCP 的核心遵循客户端-服务器架构,其中 host 应用程序可以连接到多个服务器:
![图片[3]-AI 应用开发新范式 MCP 技术详解-深渡AI-智启未来](https://oss.shenduai.net/2025/07/20250718113248341-1024x701.png)
- MCP 主机:像 Claude 桌面、IDE 或 AI 工具等应用程序,这些应用程序需要通过 MCP 访问外部数据。
- MCP 客户端:保持与服务端 1:1 连接的协议客户端 。
- MCP 服务端:通过标准化的 MCP(模型上下文协议)暴露特定功能的轻量级程序 。
- 本地数据源:MCP 服务端可以安全访问的计算机文件、数据库和服务 。
- 远程服务:通过互联网(例如,通过 API)可访问的外部系统,MCP 服务端可以连接到这些系统。
将 MCP 视作一座桥梁,可以清晰地看到:MCP 本身并不处理繁重的逻辑。MCP 只是简单地协调 AI 模型与工具之间的数据和指令流动。
MCP 服务端可以提供三种主要类型的功能:
- 资源:可以被客户端读取的类似文件的数据(如 API 响应或文件内容)
- 工具:LLM 可以调用的外部功能。
- 提示:帮助用户完成特定任务的预写模板。
1.4 何时使用 MCP
以下三个应用场景示例,比较了使用 MCP 和使用传统 API 的区别:
- 旅行规划助手
- 使用 API:需要为日历、电子邮件、航空公司预订 API 编写单独的代码,每个 API 都有自定义的身份验证、上下文传递和错误处理逻辑。
- 使用 MCP:AI 助手可以顺畅地检查日程安排以确认空档时间,预订机票,并通过电子邮件发送确认信息。全部通过 MCP 服务器实现,无需为每个工具进行自定义集成。
- 高级 IDE(智能代码编辑器)
- 使用 API:需要手动将 IDE 与文件系统、版本控制、包管理器和文档集成。
- 使用 MCP:IDE 通过单一的 MCP 协议连接到外部系统,实现更丰富的上下文感知和更强大的建议功能。
- 复杂数据分析
- 使用 API:需要手动管理与每个数据库和数据可视化工具的连接。
- 使用 MCP:智能分析平台通过统一的 MCP 层自主发现并与多个数据库、可视化工具和模拟工具进行交互。
1.4.1 使用 MCP 的好处
- 简化开发:一次编写,多次集成,无需为每次集成重写自定义代码。
- 灵活性:切换 AI 模型或工具无需复杂重新配置。
- 实时响应能力:MCP 连接保持活跃,实现实时上下文更新和交互。
- 安全性和合规性:内置访问控制和标准化安全实践。
- 可扩展性:随着 AI 应用系统的迭代,轻松添加新功能 。只需新增连接到另一个 MCP 服务器。
1.4.2 何时传统 API 更合适
如果使用场景需要精确、可预测的交互,并且有严格的限制,那么传统 API 可能更合适。MCP 提供广泛、动态的功能,适用于需要灵活性和上下文感知的场景,但对于高度受控、确定性的应用场景,可能不太适合。
当需要以下情况时,使用传统 API 会更合适:
- 需要细粒度控制和高度特定、受限的功能。
- 希望通过紧密耦合来优化性能。
- 希望在最小化上下文自主性的情况下获得最大可预测性。
1.4.3 使用 MCP 的步骤
- 定义功能:明确 MCP 服务器将提供什么功能。
- 实现 MCP 层:遵循标准化的 MCP 协议规范。
- 选择传输方式:决定使用本地(标准输入输出)还是远程(服务器发送事件 / WebSocket)方式。
- 创建资源 / 工具:开发或连接到具体的数据源和服务,并将其暴露给 MCP 服务。
- 设置客户端:建立 MCP 服务器和客户端之间的安全稳定连接。
1.5 参考文档
- MCP 官方文档:https://modelcontextprotocol.io/introduction
- MCP python SDK:https://github.com/modelcontextprotocol/python-sdk
- 支持 MCP 协议的 server:https://github.com/modelcontextprotocol/servers
- Norah Sakal Blog:https://norahsakal.com/blog/mcp-vs-api-model-context-protocol-explained/
第二章 MCP客户端与服务端交互流程
介绍 MCP 客户端与客户端的交互流程,并以 MCP 的官方 python sdk 代码为例进行代码详解,以帮助更好地理解相关知识。
2.1 核心功能对象
- 会话管理:管理用户与 LLM 的交互对话,维护对话的历史消息;关联 MCP 客户端。
- MCP 客户端:保持与 MCP 服务端 1:1 连接的协议客户端。
- MCP 服务端:通过标准化的 MCP(模型上下文协议)暴露特定功能的轻量级程序(如:暴露工具,并提供工具调用服务)
- 工具集:MCP 服务端管理的工具集。
![图片[4]-AI 应用开发新范式 MCP 技术详解-深渡AI-智启未来](https://oss.shenduai.net/2025/07/20250718113345400-1024x426.png)
2.2 客户端与服务端交互流程
MCP 服务端可以提供资源(Resources)、工具(Tools)等 API,供客户端调用。这里以 MCP 的官方 python sdk 的示例代码 mcp_simple_chatbot (https://github.com/modelcontextprotocol/python-sdk/blob/main/examples/clients/simple-chatbot/mcp_simple_chatbot/main.py)为例,说明 MCP 客户端与 MCP 服务端交互的交互流程,实现 LLM 对外部工具的调用。
- 用户输入问题
- 会话管理(ChatSession)将问题发送给 LLMClient
- LLMClient 调用 LLM API,获取 LLM 的响应
- 根据 LLM 响应判断是否需要使用工具,若要使用工具,执行以下流程:
- 请求 Server 执行工具(请求内容包含工具名、参数等信息)
- Server 调用具体的 Tool,并返回工具执行结果
- ChatSession 将工具结果发送给 LLM
- LLM 根据工具执行结果,返回最终响应
- 会话管理(ChatSession)将最终响应返回给用户
![图片[5]-AI 应用开发新范式 MCP 技术详解-深渡AI-智启未来](https://oss.shenduai.net/2025/07/20250718113426727.png)
2.3 mcp_simple_chatbot 代码详解
官方的 mcp_simple_chatbot 示例(https://github.com/modelcontextprotocol/python-sdk/blob/main/examples/clients/simple-chatbot/mcp_simple_chatbot/main.py),实现了基于 MCP 协议的外部工具调用。以下介绍其核心代码。
2.3.1 Server
Server 类是 MCP 客户端中负责管理与 MCP 服务器连接和工具执行的核心组件。
- 初始化与配置管理
- 管理服务器名称和配置信息
- 维护客户端会话状态
- 使用锁机制确保资源清理的线程安全
- 使用 AsyncExitStack 管理异步资源
def __init__(self, name: str, config: dict[str, Any]) -> None:
    self.name: str = name
    self.config: dict[str, Any] = config
    self.stdio_context: Any | None = None
    self.session: ClientSession | None = None
    self._cleanup_lock: asyncio.Lock = asyncio.Lock()
self.exit_stack: AsyncExitStack = AsyncExitStack()- 服务器连接初始化
这里的 MCP 服务端是在本地机器上运行的(运行相关命令 command,启动 MCP 服务端)
- 解析并验证服务器启动命令
- 配置服务器参数(命令、参数、环境变量)
- 建立与服务器的通信通道
- 初始化客户端会话
async def initialize(self) -> None:
    """Initialize the server connection."""
    command = (
        shutil.which("npx")
        if self.config["command"] == "npx"
        else self.config["command"]
    )
    if command isNone:
        raise ValueError("The command must be a valid string and cannot be None.")

    server_params = StdioServerParameters(
        command=command,
        args=self.config["args"],
        env={**os.environ, **self.config["env"]}
        if self.config.get("env")
        elseNone,
    )
    try:
        stdio_transport = await self.exit_stack.enter_async_context(
            stdio_client(server_params)
        )
        read, write = stdio_transport
        session = await self.exit_stack.enter_async_context(
            ClientSession(read, write)
        )
        await session.initialize()
        self.session = session
    except Exception as e:
        logging.error(f"Error initializing server {self.name}: {e}")
        await self.cleanup()
raise- 工具管理
- MCP 服务端提供相关的 API,暴露给其可提供的工具集信息(将外部资源工具,以接口服务的形式提供,这是 MCP 与 Function Call 的区别之一)。调用服务端 API,获取全部工具信息。
- 将工具信息转换为标准格式并返回
async def list_tools(self) -> list[Any]:
    """List available tools from the server.

    Returns:
        A list of available tools.

    Raises:
        RuntimeError: If the server is not initialized.
    """
    ifnot self.session:
        raise RuntimeError(f"Server {self.name} not initialized")

    tools_response = await self.session.list_tools()
    tools = []

    for item in tools_response:
        if isinstance(item, tuple) and item[0] == "tools":
            for tool in item[1]:
                tools.append(Tool(tool.name, tool.description, tool.inputSchema))

return tools- 工具执行
- 执行指定的工具,并返回结果
- 提供重试机制处理临时故障,支持自定义重试次数和延迟
async def execute_tool(
        self,
        tool_name: str,
        arguments: dict[str, Any],
        retries: int = 2,
        delay: float = 1.0,
) -> Any:
    """Execute a tool with retry mechanism.

    Args:
        tool_name: Name of the tool to execute.
        arguments: Tool arguments.
        retries: Number of retry attempts.
        delay: Delay between retries in seconds.

    Returns:
        Tool execution result.

    Raises:
        RuntimeError: If server is not initialized.
        Exception: If tool execution fails after all retries.
    """
    ifnot self.session:
        raise RuntimeError(f"Server {self.name} not initialized")

    attempt = 0
    while attempt < retries:
        try:
            logging.info(f"Executing {tool_name}...")
            result = await self.session.call_tool(tool_name, arguments)

            return result

        except Exception as e:
            attempt += 1
            logging.warning(
                f"Error executing tool: {e}. Attempt {attempt} of {retries}."
            )
            if attempt < retries:
                logging.info(f"Retrying in {delay} seconds...")
                await asyncio.sleep(delay)
            else:
                logging.error("Max retries reached. Failing.")
                raise
2.3.2 Tool 类
Tool 类提供的工具的定义和格式化功能
- 定义
- 工具名称:唯一标识符
- 工具描述:说明工具的功能和用途
- 输入模式:定义工具的参数和类型
def __init__(
        self, name: str, description: str, input_schema: dict[str, Any]
    ) -> None:
    self.name: str = name
    self.description: str = description
self.input_schema: dict[str, Any] = input_schema- 格式化功能
为 LLM 格式化工具信息
- 生成参数描述,标记必需参数
- 提供清晰的工具文档
def format_for_llm(self) -> str:
    """Format tool information for LLM.

    Returns:
        A formatted string describing the tool.
    """
    args_desc = []
    if"properties"in self.input_schema:
        for param_name, param_info in self.input_schema["properties"].items():
            arg_desc = (
                f"- {param_name}: {param_info.get('description', 'No description')}"
            )
            if param_name in self.input_schema.get("required", []):
                arg_desc += " (required)"
            args_desc.append(arg_desc)

    return f"""
Tool: {self.name}
Description: {self.description}
Arguments:
{chr(10).join(args_desc)}
"""
2.3.3 LLMClient
LLMClient 负责管理与 LLM 的连接,向 LLM 发送请求,获取 LLM 返回的响应
try:
    with httpx.Client() as client:
        response = client.post(url, headers=headers, json=payload)
        response.raise_for_status()
        data = response.json()
        return data["choices"][0]["message"]["content"]

except httpx.RequestError as e:
    error_message = f"Error getting LLM response: {str(e)}"
    logging.error(error_message)

    if isinstance(e, httpx.HTTPStatusError):
        status_code = e.response.status_code
        logging.error(f"Status code: {status_code}")
        logging.error(f"Response details: {e.response.text}")

    return (
        f"I encountered an error: {error_message}. "
        "Please try again or rephrase your request."
    )
2.3.4 ChatSession 类
ChatSession(会话管理)负责协调用户、LLM 和客户端之间交互
- LLM 响应处理
- 解析 LLM 响应,判断 LLM 是否要求调用工具
- 若 LLM 响应包含调用工具信息,执行相应的工具,并返回工具执行结果
async def process_llm_response(self, llm_response: str) -> str:
    """Process the LLM response and execute tools if needed.

    Args:
        llm_response: The response from the LLM.

    Returns:
        The result of tool execution or the original response.
    """
    import json

    try:
        tool_call = json.loads(llm_response)
        if"tool"in tool_call and"arguments"in tool_call:
            logging.info(f"Executing tool: {tool_call['tool']}")
            logging.info(f"With arguments: {tool_call['arguments']}")

            for server in self.servers:
                tools = await server.list_tools()
                if any(tool.name == tool_call["tool"] for tool in tools):
                    try:
                        result = await server.execute_tool(
                            tool_call["tool"], tool_call["arguments"]
                        )

                        if isinstance(result, dict) and"progress"in result:
                            progress = result["progress"]
                            total = result["total"]
                            percentage = (progress / total) * 100
                            logging.info(
                                f"Progress: {progress}/{total} "
                                f"({percentage:.1f}%)"
                            )

                        returnf"Tool execution result: {result}"
                    except Exception as e:
                        error_msg = f"Error executing tool: {str(e)}"
                        logging.error(error_msg)
                        return error_msg

            returnf"No server found with tool: {tool_call['tool']}"
        return llm_response
    except json.JSONDecodeError:
return llm_response- 对话管理
- 初始化服务器环境
- 收集 MCP 服务端提供的全部工具信息
- 构建系统提示(这里的系统 prompt 比较关键,要求 LLM 自行判断是否要执行工具。LLM 若判断要执行工具,需要按照规定的 Json 格式,返回工具调用请求信息)
- 主循环处理:
- 处理用户输入
- 管理对话上下文,将历史对话信息保存在 messages
- 协调工具执行,并将工具执行结果保存到对话上下文
- 生成最终响应
async def start(self) -> None:
    """Main chat session handler."""
    try:
        for server in self.servers:
            try:
                await server.initialize()
            except Exception as e:
                logging.error(f"Failed to initialize server: {e}")
                await self.cleanup_servers()
                return

        all_tools = []
        for server in self.servers:
            tools = await server.list_tools()
            all_tools.extend(tools)

        tools_description = "\n".join([tool.format_for_llm() for tool in all_tools])

        system_message = (
            "You are a helpful assistant with access to these tools:\n\n"
            f"{tools_description}\n"
            "Choose the appropriate tool based on the user's question. "
            "If no tool is needed, reply directly.\n\n"
            "IMPORTANT: When you need to use a tool, you must ONLY respond with "
            "the exact JSON object format below, nothing else:\n"
            "{\n"
            '    "tool": "tool-name",\n'
            '    "arguments": {\n'
            '        "argument-name": "value"\n'
            "    }\n"
            "}\n\n"
            "After receiving a tool's response:\n"
            "1. Transform the raw data into a natural, conversational response\n"
            "2. Keep responses concise but informative\n"
            "3. Focus on the most relevant information\n"
            "4. Use appropriate context from the user's question\n"
            "5. Avoid simply repeating the raw data\n\n"
            "Please use only the tools that are explicitly defined above."
        )

        messages = [{"role": "system", "content": system_message}]

        whileTrue:
            try:
                user_input = input("You: ").strip().lower()
                if user_input in ["quit", "exit"]:
                    logging.info("\nExiting...")
                    break

                messages.append({"role": "user", "content": user_input})

                llm_response = self.llm_client.get_response(messages)
                logging.info("\nAssistant: %s", llm_response)

                result = await self.process_llm_response(llm_response)

                if result != llm_response:
                    messages.append({"role": "assistant", "content": llm_response})
                    messages.append({"role": "system", "content": result})

                    final_response = self.llm_client.get_response(messages)
                    logging.info("\nFinal response: %s", final_response)
                    messages.append(
                        {"role": "assistant", "content": final_response}
                    )
                else:
                    messages.append({"role": "assistant", "content": llm_response})

            except KeyboardInterrupt:
                logging.info("\nExiting...")
                break

    finally:
        await self.cleanup_servers()
2.3.5 main 函数
- 设置必要的环境
- 初始化所有组件
- 建立必要的连接
- 启动交互式会话
async def main() -> None:
    """Initialize and run the chat session."""
    config = Configuration()
    server_config = config.load_config("servers_config.json")
    servers = [
        Server(name, srv_config)
        for name, srv_config in server_config["mcpServers"].items()
    ]
    llm_client = LLMClient(config.llm_api_key)
    chat_session = ChatSession(servers, llm_client)
    await chat_session.start()
第三章 MCP编程实战 – 服务端的开发与功能验证
本章从开发实践的角度出发,介绍 MCP 服务端的编码开发及其功能验证步骤,主要内容有:
- 介绍 MCP 服务端提供的服务类型(Resource、Prompt、Tool)及其适用场景。
- 一个服务端的编码开发示例:通过 Resource 访问数据库数据;通过 Prompt 生成代码调试提示模板;通过 Tool 实现数学运算功能。
- 使用 MCP Inspector,高效地对开发的 MCP 服务端功能进行测试验证。
3.1 服务端提供的服务类型
MCP 服务端(servers)可以为客户端(clients)提供 Resources、tools 和 prompts 三类服务。
![图片[6]-AI 应用开发新范式 MCP 技术详解-深渡AI-智启未来](https://oss.shenduai.net/2025/07/20250718114701944-1024x498.png)
3.1.1 Resources
Resources 是 MCP 中的一个核心原语,它允许 servers 暴露可以被 clients 读取并用作与 LLM 交互的上下文数据和内容。
用途:提供数据和上下文信息
特点:
- 只读操作
- 类似 REST API 的 GET 请求
- 使用 URI 风格的路径
- 适合缓存
典型场景:
- 读取文件内容
- 获取配置信息
- 查询数据库数据
- 获取系统状态
每个 resource 都由一个唯一的 URI 标识,并且可以包含文本或二进制数据。
3.1.2 Prompts
Prompts 允许 servers 定义可复用的提示模板和工作流,clients 可以轻松地将它们呈现给用户和 LLMs。Prompts 提供了一种强大的方式来标准化和共享常见的 LLM 交互。
用途:定义与 LLM 交互的模板特点:
- 提供结构化的提示模板
- 可以包含参数
- 指导 LLM 的输出
- 可重用的交互模式
典型场景:
- 生成文本模板
- 定义对话流程
- 标准化 LLM 输出
- 创建特定任务的指令
3.1.3 Tools
Tools 使 servers 能够向 clients 暴露可执行功能。通过 tools,LLMs 可以与外部系统交互、执行计算并在现实世界中采取行动。
Tools 的关键特性有:
- Discovery (发现):Clients 可以通过 tools/list endpoint 列出可用的 tools
- Invocation (调用):Tools 使用 tools/call endpoint 调用,其中 servers 执行请求的操作并返回结果
- Flexibility (灵活性):Tools 的范围可以从简单的计算到复杂的 API 交互
用途:执行操作和计算
特点:
- 可以影响或修改外部系统的状态
- 类似 REST API 的 POST/PUT/DELETE
- 执行具体的功能
典型场景:
- 数学计算
- 数据处理
- API 调用
- 文件操作
与 resources 一样,tools 通过唯一的名称进行标识,并且可以包含描述以指导其使用。但是,与 resources 不同的是,tools 代表可以修改状态或与外部系统交互的动态操作。
3.1.4 三类服务功能比较
| 特性 | Resource | Tool | Prompt |
|---|---|---|---|
| 主要功能 | 提供数据 | 执行操作 | 定义模板 |
| 操作类型 | 只读 | 读写 | 模板定义 |
| 状态修改 | 否 | 是 | 否 |
| 缓存支持 | 是 | 否 | 是 |
| 典型用途 | 数据获取 | 功能执行 | 交互指导 |
3.2 一个服务端的编程实现示例
3.2.1 项目创建
1. 安装 uv
本文使用 uv 作为包管理工具(也可以使用 pip、poetry、conda 其他包管理工具)。uv 是 Astral 公司推出的一款基于 Rust 编写的 Python 包管理工具,提供了快速、可靠且易用的包管理体验,在性能、兼容性和功能上都有出色表现。
安装 uv 工具命令(以 windows 为例):
# On Windows.
powershell -ExecutionPolicy ByPass -c "irm https://astral.sh/uv/install.ps1 | iex"

# With pip.
pip install uv
uv 的相关命令介绍
An extremely fast Python package manager.

Usage: uv [OPTIONS] <COMMAND>

Commands:
  run                        Run a command or script
  init                       Create a new project
  add                        Add dependencies to the project
  remove                     Remove dependencies from the project
  sync                       Update the project's environment
  lock                       Update the project's lockfile
  export                     Export the project's lockfile to an alternate format
  tree                       Display the project's dependency tree
  tool                       Run and install commands provided by Python packages
  python                     Manage Python versions and installations
  pip                        Manage Python packages with a pip-compatible interface
  venv                       Create a virtual environment
  build                      Build Python packages into source distributions and wheels
  publish                    Upload distributions to an index
  cache                      Manage uv's cache
  self                       Manage the uv executable
  version                    Display uv's version
  generate-shell-completion  Generate shell completion
  help                       Display documentation for a command
2. 创建 python 项目
使用 uv 命令,创建项目
# 创建 python 项目,项目名称为 mcp_learning
uv init mcp_learning
cd mcp_learning

# 激活虚拟环境
uv venv
.venv\Scripts\activate
3. 安装 python 依赖包
# 安装相关依赖包
uv add mcp[cli] httpx

# 连接 pg 数据库的 python 包
uv add psycopg2
4. 安装 node.js
本示例会用到 MCP Inspector 来测试验证服务端的功能(MCP Inspector 是一个用于测试和调试 MCP 服务端的交互式开发者工具)。MCP Inspector 运行,需要依赖 npx,因此需要安装 node.js。
在 https://nodejs.org/zh-cn/download,选择 v22.17.0(LTS) 版本进行下载并安装:
![图片[7]-AI 应用开发新范式 MCP 技术详解-深渡AI-智启未来](https://oss.shenduai.net/2025/07/20250718114955870-1024x822.png)
3.2.2 创建服务端实例
- FastMCP 为 MCP 服务端的主要实现类。创建服务端名称为 “MCP Test Server” 的实例
- 启用了调试模式,产生更详细的日志输出,方便调试。
- 服务器配置为监听 0.0.0.0(所有网络接口),接受来自本地和远程的连接
- 端口设置为 8002,这是客户端连接服务器的端口
注意:host=”0.0.0.0″ 设置使服务器可以接受来自任何 IP 地址的连接,这在开发环境中很方便,但在生产环境中可能需要更严格的访问控制。
# 导入必要的模块
from mcp.server.fastmcp import FastMCP  # 导入 MCP 服务器的主类
import psycopg2  # PostgreSQL 数据库连接库
import json  # JSON 处理库
from psycopg2.extras import RealDictCursor  # 使查询结果以字典形式返回的游标
from mcp.server.fastmcp.prompts import base  # MCP 提示模板的基础类


# 创建 MCP 服务器
mcp = FastMCP("MCP Test Server",  # 服务器名称
              debug=True,  # 启用调试模式,会输出详细日志
              host="0.0.0.0",  # 监听所有网络接口,允许远程连接
              port=8002)  # 服务器监听的端口号
3.2.3 Resources 实现
mcp 服务端可以为 mcp 客户端定义访问数据库数据的资源端点,允许客户端查询数据库的元数据、数据表数据。下面以访问 pg 数据库数据为例。
1. 数据库连接
定义连接 PostgreSQL 数据库的配置,定义创建数据库连接的函数。
# 数据库连接配置
DB_CONFIG = {
    "dbname": "mcp_test",
    "user": "kevin",
    "password": "123456",
    "host": "localhost",
    "port": "5432"
}

def get_db_connection():
    """创建数据库连接"""
    return psycopg2.connect(**DB_CONFIG)
2. 资源定义测试示例
简单的测试资源,用于验证服务器是否正常工作。当客户端请求 test://hello 资源时,将返回 “Hello, World!” 字符串。
@mcp.resource("test://hello")
def hello() -> str:
    """简单的测试资源"""
    return "Hello, World!"
3. 表名列表查询
查询数据库中 public 模式下的全部表名,返回一个表名列表的 JSON 字符串。
# 定义资源:获取所有表名
@mcp.resource("db://tables")
def list_tables() -> str:
    """获取所有表名列表"""
    with get_db_connection() as conn:
        with conn.cursor() as cur:
            cur.execute("""
                SELECT table_name
                FROM information_schema.tables
                WHERE table_schema = 'public'
            """)
            tables = [row[0] for row in cur.fetchall()]
            return json.dumps(tables)
4. 表数据查询
定义数据表查询的资源,允许查询指定表的数据,支持参数:
- table_name: 要查询的表名
- limit: 限制返回的最大行数,默认值为 100
使用了 RealDictCursor 使结果以字典形式返回,使用了参数化查询来防止 SQL 注入攻击,并设置 ensure_ascii=False 以保留中文字符。
# 定义资源:获取表数据
@mcp.resource("db://tables/{table_name}/data/{limit}")
def get_table_data(table_name: str, limit: int = 100) -> str:
    """获取指定表的数据

    参数:
    table_name: 表名
    """
    try:
        with get_db_connection() as conn:
            with conn.cursor(cursor_factory=RealDictCursor) as cur:
                # 使用参数化查询防止 SQL 注入
                cur.execute(f"SELECT * FROM %s LIMIT %s",
                            (psycopg2.extensions.AsIs(table_name), limit))
                rows = cur.fetchall()
                # return json.dumps(list(rows), default=str)
                return json.dumps(list(rows), default=str, ensure_ascii=False)
    except Exception as e:
        return json.dumps({
            "status": "error",
            "message": str(e)
        })
5. 表结构查询
定义表结构查询的资源,允许查询指定表的结构信息,包括列名、数据类型、最大长度和列注释。(不同类型的数据库,查询表元数据的 sql 会有所不同)。
# 定义资源:获取表结构
@mcp.resource("db://tables/{table_name}/schema")
def get_table_schema(table_name: str) -> str:
    """获取表结构信息

    参数:
    table_name: 表名
    """
    with get_db_connection() as conn:
        with conn.cursor() as cur:
            cur.execute("""
                select c.column_name,
                       c.data_type,
                       c.character_maximum_length,
                       pgd.description as column_comment
                from information_schema.columns c
                left join pg_catalog.pg_statio_all_tables st
                on c.table_schema = st.schemaname and c.table_name = st.relname
                left join pg_catalog.pg_description pgd
                on pgd.objoid = st.relid
                   and pgd.objsubid = c.ordinal_position
                where c.table_name = %s
                order by c.ordinal_position
            """, (table_name,))
            columns = [{"name": row[0], "type": row[1], "max_length": row[2], "comment": row[3]}
                       for row in cur.fetchall()]
            return json.dumps(columns, ensure_ascii=False)
3.2.4 Prompts 实现
定义了 MCP prompt(提示模板),用于指导 LLM 如何回答特定类型的查询。
1. 中国省份介绍
- 使用 @mcp.prompt() 装饰器注册为 MCP 服务器的提示模板
- 接受一个参数 province,表示要介绍的中国省份名称
- 返回一个字符串提示模板,引导 LLM 按照特定结构介绍指定省份
- 提示模板要求 LLM 从四个方面介绍省份:历史沿革、人文地理和风俗习惯、经济发展状况、旅游建议
# 中国省份介绍
@mcp.prompt()
def introduce_china_province(province: str) -> str:
    """介绍中国省份

    参数:
    province: 省份名称
    """
    return f"""
    请介绍这个省份:{province}

    要求介绍以下内容:
    1. 历史沿革
    2. 人文地理、风俗习惯
    3. 经济发展状况
    4. 旅游建议
    """
2. 代码调试提示模板
提示模板的功能:
- 使用 @mcp.prompt() 装饰器注册
- 接受两个参数:code(需要调试的代码)和 error_message(错误信息)
- 与第一个模板不同,这个模板返回的是 list[base.Message] 类型,表示一个多轮对话的消息列表
对话包含五条消息:
- 系统消息:定义助手的角色和任务
- 用户消息:请求帮助修复代码
- 用户消息:包含代码内容(使用代码块格式)
- 用户消息:包含错误信息
- 助手消息:初始回应,表明将分析问题
使用场景:当用户遇到代码错误需要帮助调试时,通过预设对话历史,引导 LLM 进入特定的思考模式,提供结构化的上下文,使 LLM 能够更有效地分析和解决代码问题。
# 调试代码提示
@mcp.prompt()
def debug_code(code: str, error_message: str) -> list[base.Message]:
    """调试代码的对话式提示模板

    参数:
    code: 需要调试的代码
    error_message: 错误信息
    """
    return [
        base.SystemMessage("你是一位专业的代码调试助手。请仔细分析用户提供的代码和错误信息,找出问题所在并提供修复方案。"),
        base.UserMessage("我的代码有问题,请帮我修复:"),
        base.UserMessage(f"```\n{code}\n```"),
        base.UserMessage(f"错误信息:\n{error_message}"),
        base.AssistantMessage("我会帮你分析这段代码和错误信息。首先让我理解问题所在..."),
    ]
3.2.5 Tools 实现
定义了四个基本的数学运算工具,通过 @mcp.tool() 装饰器,将这些函数注册为 MCP 服务端的工具(可以被客户端直接调用)
@mcp.tool()
def add(a: float, b: float) -> float:
    """加法运算

    参数:
    a: 第一个数字
    b: 第二个数字

    返回:
    两数之和
    """
    return a + b


@mcp.tool()
def subtract(a: float, b: float) -> float:
    """减法运算

    参数:
    a: 第一个数字
    b: 第二个数字

    返回:
    两数之差 (a - b)
    """
    return a - b


@mcp.tool()
def multiply(a: float, b: float) -> float:
    """乘法运算

    参数:
    a: 第一个数字
    b: 第二个数字

    返回:
    两数之积
    """
    return a * b


@mcp.tool()
def divide(a: float, b: float) -> float:
    """除法运算

    参数:
    a: 被除数
    b: 除数

    返回:
    两数之商 (a / b)

    异常:
    ValueError: 当除数为零时
    """
    if b == 0:
        raise ValueError("除数不能为零")
    return a / b
3.2.6 main 函数
mcp 服务端提供 stdio 和 sse 两种传输协议运行方式。默认是使用 stdio 协议(适用于本地调试)。sse 协议适用于生产环境。
if __name__ == "__main__":
    mcp.run('sse')
3.3 使用 MCP Inspector 验证服务端功能
MCP Inspector 是专为 MCP 服务端设计的交互式调试工具,提供了一个直观的界面,使得开发者能够快速地验证服务端的响应和状态。使用 MCP Inspector 来测试验证上述开发的服务端功能。
3.3.1 运行 MCP Inspector
在终端运行 mcp –help,可以查看 mcp 命令的用法(由下面的返回结果可知,可以通过 mcp dev 命令运行 mcp inspector):
>mcp --helpmcp dev 命令语法:
mcp dev --help![图片[8]-AI 应用开发新范式 MCP 技术详解-深渡AI-智启未来](https://oss.shenduai.net/2025/07/20250718115659853-1024x831.png)
运行命令:mcp dev db_server_see.py( mcp dev 命令默认使用 stdio 通信方式来启动 mcp 服务端),对上面开发的 mcp 服务端功能进行测试。点击输出的链接,即可打开浏览器,进入 mcp inspector 用户界面:
![图片[9]-AI 应用开发新范式 MCP 技术详解-深渡AI-智启未来](https://oss.shenduai.net/2025/07/20250718115731377-1024x380.png)
打开 mcp inspector 的页面,点击左侧的 connect 按钮,连接到 mcp 服务端:
![图片[10]-AI 应用开发新范式 MCP 技术详解-深渡AI-智启未来](https://oss.shenduai.net/2025/07/20250718115752615-1024x634.png)
连接到 mcp 服务端后,左侧的页面顶部显示 Resources、Prompts、Tools 三个按钮,可以分别对服务端暴露的 Resources、Prompts、Tools 功能进行测试验证。
![图片[11]-AI 应用开发新范式 MCP 技术详解-深渡AI-智启未来](https://oss.shenduai.net/2025/07/20250718115817999-1024x751.png)
3.3.2 Resources 功能验证
点击 Resources,然后点击下方的 List Resources、List Templates,可以查看资源 list。
![图片[12]-AI 应用开发新范式 MCP 技术详解-深渡AI-智启未来](https://oss.shenduai.net/2025/07/20250718115839783-1024x368.png)
查看数据库的数据表清单,点击资源 URI list_table 后,右侧可以查看到 mcp 服务端返回的内容,目前数据库有两张数据表,分别是 chinese_provinces、chinese_movie_ratings 两张表:
![图片[13]-AI 应用开发新范式 MCP 技术详解-深渡AI-智启未来](https://oss.shenduai.net/2025/07/20250718115901315-1024x375.png)
查看具体某张数据表的数据内容。点击 get_table_data 资源,输入表名参数和 limit 参数,点击 Read Resource,可以查看 mcp 服务端返回的数据表数据:
![图片[14]-AI 应用开发新范式 MCP 技术详解-深渡AI-智启未来](https://oss.shenduai.net/2025/07/20250718115921930-1024x332.png)
Prompts 功能验证
点击 Prompts 下的 List Prompts,列出全部 Prompts:
![图片[15]-AI 应用开发新范式 MCP 技术详解-深渡AI-智启未来](https://oss.shenduai.net/2025/07/20250718120000966-1024x264.png)
选择其中一个 Prompt,输入参数 (如,广东省),点击 Get Prompt,即可按照预先设定的 prompt 模板,生成 prompt:
![图片[16]-AI 应用开发新范式 MCP 技术详解-深渡AI-智启未来](https://oss.shenduai.net/2025/07/20250718120019881-1024x658.png)
3.3.3 Tools 功能验证
点击 Tools 下的 List Tools,列出全部工具,选择其中一个,输入参数,点击 Run Tools,即可调用工具,获取返回的运行结果:
![图片[17]-AI 应用开发新范式 MCP 技术详解-深渡AI-智启未来](https://oss.shenduai.net/2025/07/20250718120050632-1024x794.png)
通过 mcp inspector,可以快捷高效地测试验证我们开发的 mcp 服务端功能。


暂无评论内容